Hiding error details on production in ZF2
Unlike ZF1, Zend Framework 2 doesn't have a built-in concept of "production" or "development" environments, so by default, the error pages (which include a full stack trace) will appear on your production servers as well as your development environments. This isn't really desirable, but it is easy to change. The local.php config files are excluded from source control, and so are the place for environment-specific configuration.
To hide the error details, edit config/autoload/local.php on your production server and add (to the existing array defined in that file):
'view_manager' => array(
    'display_exceptions' => false
)
And that will hide your error details on your production server only.
RIP Google Reader
Google Reader shut its doors today. I am one of the many who'll mourn it's closure, as it's a service I've used on a daily basis for many years.
For me it was the synchronisation that was the killer feature. I mostly used the web-based version, but I also have the Android client installed on my mobile and tablet. It was great to be able to fire up the client when I had a few minutes to kill (e.g. whilst on a train), knowing that I'd find a few interesting articles to read.
I track around 200 or so RSS feeds - mostly blogs, but also a few tech news sites. It served as the backend for Google Listen (Android podcast client), and up until Twitter's recent API change I used it to track a handful of Twitter searches (a very simple way of monitoring Twitter for certain phrases or URLs). I even used it to 'follow' some Twitter accounts, via. a Yahoo Pipes filter, for people who post links in such high volume that they would drown out all the other people I follow if I was to follow them via. my normal Twitter client.
The reason Google gave for its shutdown was a decline in usage, and their attempt to focus on fewer products. I certainly get a lot of my info these days via. Twitter and social bookmarking sites, but RSS is still the primary source for me. And as for focus, to quote a Hacker News comment:
"Yeah, Reader held back the development of the robot car, glasses, floating balloon internet and the brazilian social site..."
Whatever the real reason is, I find it strange that Google didn't try and at least gently steer the Reader refugees towards one of their other products. It wouldn't be a huge stretch to have some sort of 'follow' feature on Google+ that allows you to track an RSS feed (which could later be claimed by an individual or company as part of their profile). G+ already has the link sharing and comment features, and the recently introduced auto-tagging is pretty impressive, and would work nicely for auto-discovery.
As for the Reader alternatives, I tried Feedly for a week or two after Google's announcement in March. It's a nice product, but something about it didn't quite sit right with me. More recently I looked at The Old Reader and Yoleo Reader, which look like decent enough Google Reader clones, but I'm a little wary of signing up to one of the new upstarts. For now I've installed Tiny Tiny RSS. It's open source and self-hosted (so no risk of that disappearing), and fairly similar feature-wise to Google Reader with a couple of nice extras. I figure I'll stick with that for the next six months or so and then take another look at the alternatives and see if any of them have evolved into something special.
But Google Reader, you will be missed.
IE testing on Ubuntu with Microsoft's new Virtual Machine images
For a while, Microsoft provided Internet Explorer Virtual PC images that could be used to install a Virtual Machine specifically for IE testing. However, getting these running in Linux was a bit of a faff, and at times I had issues where even freshly downloaded images required a Windows activation key (making them pointless). Happily, Microsoft now has a site specifically about IE testing which includes cross-platform images to make things easier.
To use these in Ubuntu, first you'll need to install VirtualBox, which you can find in the Ubuntu Software Centre. Next, visit Microsoft's virtualization downloads page, select 'Linux' as the desired testing OS, and then 'VirtualBox' (the only option) from the platform dropdown on the right. This will give you a list of download links, grouped by Internet Explorer versions. The older IE versions, which only run on XP, have only one download link; whereas the more recent ones have several, as their image file has been split into multiple chunks. The multi-file images each have a text file download link first in the list which includes the URLs to all the file pieces. This means them very easy to download with wget:
Using the IE9 Win7 image as an example, first, download the text file itself:
wget https://az412801.vo.msecnd.net/vhd/IEKitV1_Final/VirtualBox/Linux/IE9_Win7/IE9.Win7.For.LinuxVirtualBox_2.txt
Then pass this text file to wget with the -i flag, which tells wget to download each URL it contains in succession:
wget -i IE9.Win7.For.LinuxVirtualBox_2.txt
(this might take some time depending on the speed of your Internet connection)
Once the files have downloaded, you should end up with one .sfx file and some .rar files in the folder. The next step is to make the .sfx file executable:
chmod +x IE9.Win7.For.LinuxVirtualBox.part1.sfx
and then run it:
./IE9.Win7.For.LinuxVirtualBox.part1.sfx
this will merge the files into one .ova file. OVA is a standard for self-contained virtual machine images which VirtualBox supports.
Next, run VirtualBox, and select 'Import Appliance' from its file menu:
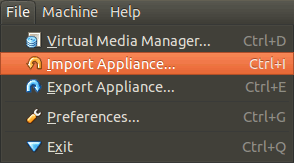
find the .ova file on your hard disk, and when it's opened, click on the highlighted 'Open Appliance' button in the main VirtualBox. This will create the new Virtual Machine which you can then run. That's it - no partitioning required, and you can now test websites using Internet Explorer.
Apparently these images are 90-day limited, although this isn't mentioned on the site. I'm not sure if this is 90 days of use or 90 days from when you first boot up the machine. I also had trouble with some of the images on there, so if you get any cryptic errors give one of the other versions a try.
Entity errors generating Atom feeds
After switching to Zend_Feed_Writer for my blog RSS and Atom feeds, I was frequently seeing errors like this in the logs:
PHP Warning: DOMDocument::loadXML(): Entity 'rsquo' not defined in Entity, line: 14 in /path/to/library/Zend/Feed/Writer/Renderer/Entry/Atom.php on line 393
(the error appeared for several different entities). This happens because entities such as ’ or are not valid in XML feeds, you need to use their numeric equivalents. Zend_Feed_Writer uses the PHP HTML Tidy extension to perform this conversion if it is available, so you should only see this error if you don't have the extension installed.
You can fix the error simply by installing the extension. On Ubuntu this is as simple as sudo apt-get install php5-tidy. This is covered in ZF ticket #9566, and the discussion indicates it's an area that was flagged for improvement in ZF2.
Dojo: preventing form submit on Enter
If you've got some AJAX functionality inside a standard form (e.g. an address lookup feature where people type in their postcode and click a button) then there's a temptation for people to hit 'Enter' to perform the search. By default this will submit the whole form, which isn't what you want.
Catching the 'Enter' key press is fairly easy to do with some inline Javascript, but it can easily be done unobtrusively with Dojo as well:
dojo.ready(
    function() {
        dojo.connect(dojo.byId('postcode'), 'onkeydown', function(event){
            if (event.keyCode == dojo.keys.ENTER) {
                // CALL AJAX CODE HERE

                dojo.stopEvent(event);
            }
        });
    }
);
I found that 'onkeyup' as the event doesn't work here - the code runs but doesn't prevent the submission, so stick to onkeydown.
Update: Here's the AMD (Dojo 1.7+) equivalent of the same thing:
require(['dojo/ready', 'dojo/dom', 'dojo/on', 'dojo/keys'], function(ready, dom, on, keys){
    ready(function(){
        on(dom.byId('postcode'), 'keydown', function(e){
           if (e.keyCode == keys.ENTER) {
               // AJAX stuff here

               event.stop(e);
           }
        });
    });
});